My Favorite Vanilla Cake Recipe
This vanilla cake is soft, fluffy, and incredibly moist with a rich vanilla flavor. It’s perfect for layer cakes, birthdays, and any time you need a reliable, bakery-style cake.

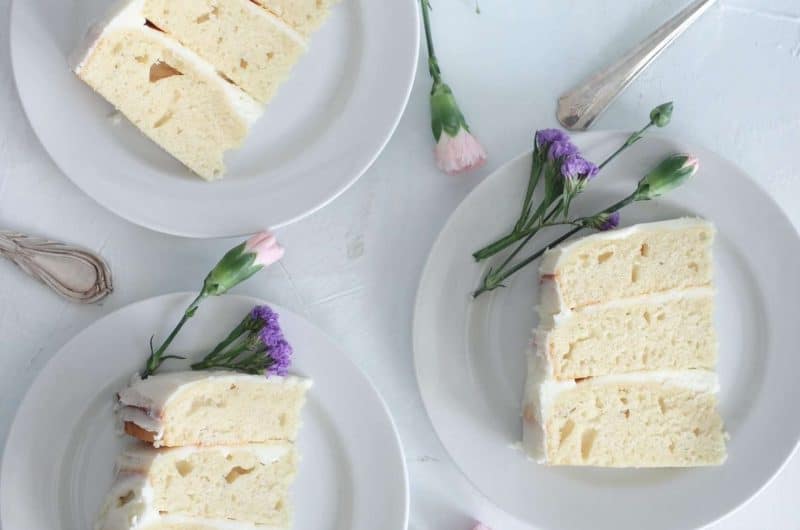
This was always my go-to vanilla cake when I was decorating cakes. It’s soft, fluffy, and stays really moist, which makes it perfect for stacking, frosting, and decorating without falling apart. I used this recipe over and over because it’s reliable, easy to work with, and tastes just as good as it looks.
Try this cake with my Cookies and Cream Filling for an Oreo twist. Or use my Healthy Vegan Cake Frosting – Cashew Based and Refined Sugar Free for a healthier cake.

*This page contains referral links for products I use and love. As an Amazon Associate, The Sprinkled Cakery earns a small commission on these links at no cost to you. Read my full disclosure here.
My Favorite Vanilla Cake Recipe
Ingredients:
- 2 1/2 cups all-purpose flour
- 1 tablespoon baking powder
- 1/2 teaspoon baking soda
- 1/2 teaspoon salt
- 1/2 cup canola oil, or oil of your choice
- 1 3/4 cups granulated sugar
- 2 large eggs, room temperature
- 2 egg whites, room temperature
- 1 tablespoon vanilla extract
- 3/4 cup whole milk, room temperature
- 3/4 cup sour cream, room temperature
Make the Cake
Steps:
- Preheat Oven: Preheat your oven to 350°F (175°C). Grease and flour four 6-inch round cake pans.
- Mix Dry Ingredients: In a medium bowl, whisk together the flour, baking powder, baking soda, and salt. Set aside.
- Mix the Wet Ingredients: Using your stand mixer with the paddle attachment or a large bowl and hand mixer, mix together the granulated sugar, oil, eggs, egg whites and vanilla extract until light and fluffy.
- Add the Sour Cream: Add the sour cream just until combined.
- Alternate Adding Dry Ingredients and Milk: Gradually add the dry ingredients to the wet ingredients, alternating with the milk. Begin and end with the dry ingredients, mixing just until combined.
- Divide Batter and Bake: Divide the batter evenly between the prepared pans. I recommend using a scale for this to make sure each layer is the same size. I use and love this one. Bake in the preheated oven for 25-30 minutes or until a toothpick inserted into the center comes out clean.
- Cool and Remove from Pans: Allow the cakes to cool in the pans for 10 minutes, then transfer them to a wire rack to cool completely. Once cooled, remove the cakes from the pans.

Make the Frosting

Italian Meringue Buttercream for Filling and Decorating:
- 4 large egg whites, at room temperature
- 1 1/4 cups granulated sugar (250g), plus additional 1/3 cup (67g) cup for adding to egg whites
- ¼ teaspoon salt. Omit salt if using salted butter.
- 16 ounces unsalted butter (454g), at room temperature, cut into 1-inch pieces
- 1 teaspoon clear vanilla extract (4.9mL). You can use pure too but it will alter the final colour if your icing.
- ¼ teaspoon cream of tartar (0.84g)
- ⅓ cup water (79mL)
- Drop of violet gel food colour
- In a stand mixer mixing bowl, beat the egg whites, salt, and cream of tartar on medium high speed using the whisk attachment.
- While the eggs are whipping, combine the 1 1/4 cup of sugar and ⅓ cup of water in a medium pot over medium heat. Maintain medium heat until the sugar temperature reaches 235-240°F. It is important to use a thermometer to get to the correct temperature. I went through many thermometers until I found this one. It’s perfect because of the long cable that connects the probe to the base, ensuring that you never drop the whole thing in and ruin it like I did many times!
- Slowly add the remaining ⅓ cup of sugar into the egg whites while beating until soft peaks form.
- Once the temperature reaches 235-240, drizzle the melted sugar into the mixer immediately. The meringue should be at the soft peak stage at this point.
Run the mixer until the meringue is cool/tepid. - Add room temperature butter into the running mixer a little bit at a time.
- Add the salt and vanilla.
- Beat until the butter is fully combined, and the mixture has reached a silky consistency.
- To get your icing a pure white colour, add a small drop of violet food colour. I like to use the Wilton one and dip the tip of a toothpick into it to get a small drop. Remember you can always add more but you can’t take away.
Assemble the cake and decorate
If your layers do not have even tops, use a large serrated knife to gently slice a thin layer off the cake tops, creating a flat surface. Now, place the first cake layer on your cake round, cake drum or serving plate. I like to glue a cake round the same size as the cake onto an MDF cake board and then place that on top of my turntable to decorate.
Using a piping bag fitted with a large tip add the buttercream frosting on top of the cake layer. I like to pipe a border around the edges first, then fill the inside. If you are using a filling other than buttercream, adding a border is imperative to ensure that nothing leaks out. Add the second and third cake layers one at a time and repeat the process.

Finally, place the fourth cake layer on top with the top of the cake facing down so that the bottom of the cake is facing up and spread a thin layer of frosting across the top and sides. For a smooth application, an icing spatula and scraper is highly recommended. Put the cake in the fridge for 20-30 minutes to set the crumb coat layer then frost more generously and use a bench scraper to create a smooth top coat.


Watch this video to see me stack, crumb coat and ice a cake.
Vanilla Cake Tips
- Make sure your eggs, egg whites, milk and sour cream are at room temperature before making for a smoother batter.
- Don’t overmix the batter to ensure a light and fluffy texture.
- Preheat your oven properly to ensure even baking.
- Consider adding a touch of almond extract for a subtle flavor boost to your vanilla cake.
- Weigh the cake batter in each pan to ensure even-sized layers.
- Resist the temptation to rush the process—cool your cake layers completely. Assembling a layer cake with partially warm layers may lead to frosting meltdown and a collapsed cake. Refrigerate or freeze each layer before assembling for that perfect, sturdy structure.
- After frosting your cake, refrigerate it for at least 1 hour. This step sets the frosting and tightens the cake layers.
Try my
More Cake/Cupcake Recipes You’ll Love:
- Easy Chocolate Cake with Cookies & Cream Filling
- Strawberry Shortcake with Chantilly Cream Filling
- The Best Strawberry Shortcake Crunch Cupcakes from Scratch
- Moist Date Cake Recipe with Natural Toffee Sauce (Easy, Naturally Sweetened)
- The Best Zucchini Cupcakes Recipe
- Honey Lemon Cupcakes with Cream Cheese Frosting
Frequently Asked Questions
Absolutely! I have made stacked cakes with this recipe many times and they have always held up.
Yes! Whole milk is best but I have substituted with 2% and even 1% in a pinch and it has turned out wonderfully.
Yes, I actually recommend to do this. I usually make my cakes a few days before and freeze them once cooled to lock in freshness and moistness. Be sure to wrap each layer in saran wrap then aluminum foil before freezing.
My go-to frosting is Italian Meringue Buttercream, which I’ve included the recipe for as well; however, feel free to experiment with your favourite frosting. I’ve made this with American as well for a sweeter bite for kids.
Watch this video to see me stack, crumb coat and ice a cake.
My Favorite Vanilla Cake Recipe
Course: DessertCuisine: AmericanDifficulty: Easy12
servings30
minutes30
minutes546
kcal1
hourA soft and fluffy vanilla cake that’s easy to make and perfect for layering, decorating, and special occasions. Moist, tender, and full of classic vanilla flavor.
Ingredients
- Vanilla Cake
2 1/2 cups all-purpose flour
1 tablespoon baking powder
1/2 teaspoon baking soda
1/2 teaspoon salt
1/2 cup canola oil, or oil of your choice
1 3/4 cups granulated sugar
2 large eggs, room temperature
2 egg whites, room temperature
1 tablespoon vanilla extract
3/4 cup whole milk, room temperature
3/4 cup sour cream, room temperature
- Italian Meringue Buttercream
4 egg whites
1 1/4 cups granulated sugar (250g), plus additional 1/3 cup (67g) for adding to egg whites
¼ teaspoon salt. Omit salt if using salted butter.
16 ounces unsalted butter (454g), at room temperature, cut into 1-inch pieces
1 teaspoon clear vanilla extract (4.9mL). You can use pure but it will alter the final color of your icing, so stick to clear if you need a pure white icing.
¼ teaspoon cream of tartar (0.84g)
⅓ cup water (79mL)
Drop of violet gel food color if you want a pure white icing
Directions
- Preheat Oven: Preheat your oven to 350°F (175°C). Grease and flour four 6-inch round cake pans.
- Mix Dry Ingredients: In a medium bowl, whisk together the flour, baking powder, baking soda, and salt. Set aside.
- Mix the Wet Ingredients: Using your stand mixer with the paddle attachment or a large bowl and hand mixer, mix together the granulated sugar, oil, eggs, egg whites and vanilla extract until light and fluffy.
- Add the Sour Cream: Add the sour cream just until combined.
- Alternate Adding Dry Ingredients and Milk: Gradually add the dry ingredients to the wet ingredients, alternating with the milk. Begin and end with the dry ingredients, mixing just until combined.
- Divide Batter and Bake: Divide the batter evenly between the prepared pans. I recommend using a scale for this to make sure each layer is the same size. II use and love this one. Bake in the preheated oven for 25-30 minutes or until a toothpick inserted into the center comes out clean.
- Cool and Remove from Pans: Allow the cakes to cool in the pans for 10 minutes, then transfer them to a wire rack to cool completely. Once cooled, remove the cakes from the pans.
- Make the Frosting
- In a stand mixer mixing bowl, beat the egg whites, salt, and cream of tartar on medium high speed using the whisk attachment.
- While the eggs are whipping, combine the 1 1/4 cup of sugar and ⅓ cup of water in a medium pot over medium heat. Maintain medium heat until the sugar temperature reaches 235-240°F. It is important to use a thermometer to get to the correct temperature. I went through many thermometers until I found this one. It’s perfect because of the long cable that connects the probe to the base, ensuring that you never drop the whole thing in and ruin it like I did many times!
- Slowly add the remaining ⅓ cup of sugar into the egg whites while beating until soft peaks form.
- Once the temperature reaches 235-240, drizzle the melted sugar into the mixer immediately. The meringue should be at the soft peak stage at this point.
Run the mixer until the meringue is cool/tepid. - Add room temperature butter into the running mixer a little bit at a time.
- Add the salt and vanilla.
- Beat until the butter is fully combined, and the mixture has reached a silky consistency.
- To get your icing a pure white colour, add a small drop of violet food colour. I like to use the Wilton one and dip the tip of a toothpick into it to get a small drop. Remember you can always add more but you can’t take away.
- Assemble the cake and decorate
- If your layers do not have even tops, use a large serrated knife to gently slice a thin layer off the cake tops, creating a flat surface. Now, place the first cake layer on your cake round, cake drum or serving plate. I like to glue a cake round the same size as the cake onto an MDF cake board or drum and then place that on top of my turntable to decorate.
- Using a piping bag fitted with a large tip add the buttercream frosting on top of the cake layer. I like to pipe a border around the edges first, then fill the inside. If you are using a filling other than buttercream, adding a border is imperative to ensure that nothing leaks out. Add the second and third cake layers one at a time and repeat the process.
- Finally, place the fourth cake layer on top with the top of the cake facing down so that the bottom of the cake is facing up and spread a thin layer of frosting across the top and sides. For a smooth application, an icing spatula and scraper is highly recommended. Put the cake in the fridge for 20-30 minutes to set the crumb coat layer then frost more generously to create a smooth top coat.
Notes
- Make sure your eggs, egg whites, milk and sour cream are at room temperature before making for a smoother batter.
- Don’t overmix the batter to ensure a light and fluffy texture.
- Weigh the cake batter in each pan using a kitchen scale to ensure even-sized layers.
- Resist the temptation to rush the process—cool your cake layers completely. Assembling a layer cake with partially warm layers may lead to frosting meltdown and a collapsed cake. Refrigerate or freeze each layer before assembling for that perfect, sturdy structure.
- After frosting your cake, refrigerate it for at least 1 hour. This step sets the frosting and tightens the cake layers.
- Watch this video to see me stack, crumb coat and ice a cake.
Nutrition Facts
12 servings per container
- Amount Per ServingCalories546
- % Daily Value *
- Total Fat
38.2g
49%
- Saturated Fat 21.2g 106%
- Cholesterol 146mg 49%
- Sodium 3063mg 134%
- Total Carbohydrate
39.3g
15%
- Dietary Fiber 0.7g 3%
- Total Sugars 17.8g
- Protein 12g 24%
- Vitamin D 29mcg 145%
- Calcium 402mg 31%
- Iron 2mg 12%
- Potassium 1350mg 29%
* The % Daily Value tells you how much a nutrient in a serving of food contributes to a daily diet. 2,000 calories a day is used for general nutrition advice.
I love this cute idea. I will definitely save this and make it for our neighborhood Holiday party.
That makes me so happy to hear! It’s perfect for a holiday party. I hope everyone loves it!