Cookies and Cream Cake Recipe (Easy, Moist & From Scratch)
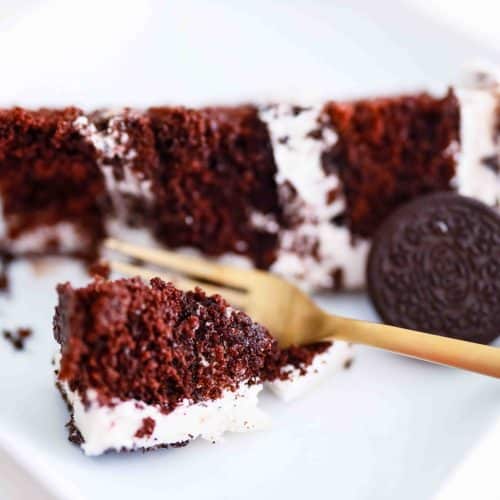
This cookies and cream chocolate cake features moist chocolate layers filled with a creamy cookies-and-cream filling. Based on a classic Hershey’s chocolate cake, it’s rich, easy to make, and perfect for chocolate lovers.

QUICK LOOK: COOKIES AND CREAM CAKE RECIPE
Prep Time: 30 minutes
Bake Time: 35 Minutes
Rest time: 20 Minutes
Total Time: 1 hour, 25 mintes
Servings: 12 Cake Slices
Calories: ~750 per slice (estimated)
Difficulty: Easy, beginner-friendly
Key Ingredients: Granulated sugar, all-purpose flour, cocoa powder, baking powder, baking soda, salt, eggs, milk, vegetable oil, vanilla extract, boiling water or hot coffee, Oreos, butter, powdered sugar, marshmallow fluff, heavy cream
What makes this recipe different:
What sets this cake apart is the combination of a super moist oil-based chocolate cake with a light, fluffy cookies and cream filling made with marshmallow fluff instead of a dense buttercream. It gives you that classic Oreo flavor, but in a softer, creamier texture that balances the richness of the chocolate cake.
If you love rich chocolate cake and cookies and cream anything, this one is for you. This cake is soft, super moist, and layered with a light, fluffy Oreo filling that makes it feel a little extra special without being complicated. It’s the kind of cake that looks impressive but is actually really simple to make.
If you’re a chocolate lover, you’ll also love my Dubai Chocolate Avocado Brownies or Fudgy Protein Brownie Mug Cake.
To Make the Chocolate Cake Layers, You’ll Need the Following Ingredients:
- 2 cups sugar
- 2 cups all-purpose flour
- 3/4 cup cocoa powder
- 1 1/2 teaspoons baking powder
- 1 1/2 teaspoons baking soda
- 1 teaspoon salt
- 2 eggs
- 1 cup milk
- 1/2 cup vegetable oil
- 2 teaspoons vanilla extract
- 1 cup boiling water
- 1 teaspoon espresso powder, optional ** NOTE: You can also use 1 cup of hot coffee in place of the boiling water and espresso powder or leave it out all together and just use boiling water. The coffee/espresso helps to bring out and enhance the chocolate flavor in the cake; you don’t taste the coffee.
How to Make the Chocolate Cake Layers

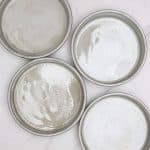
- Preheat and Prep: Preheat your oven to 350°F (175°C). Grease and flour four 6-inch round baking pans.
- Mix Dry Ingredients: In a large bowl, combine the sugar, flour, cocoa, baking powder, baking soda, and salt.
- Add Wet Ingredients: Add the eggs, milk, oil, and vanilla. Beat on medium speed for about 2 minutes until smooth. The batter will be thin, but that’s what we want!
- Mix the Espresso Powder With the Boiling Water and Add to Cake: Mix the espresso powder into the boiling water and carefully add to the cake batter. The batter will be very thin at this point.
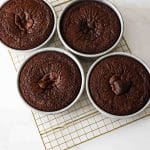
- Bake: Divide the batter evenly between the four prepared pans. TIP: I use a kitchen scale to ensure I put even amounts in each pan to get even cake layers. Bake for 30 to 35 minutes, or until a toothpick inserted into the center comes out clean.
- Cool: Allow the cakes to cool in the pans for about 20 minutes. Then, flip them upside down to release the cakes from the pans and transfer them to wire racks to cool completely.
Also try my favorite vanilla cake recipe, my popular easy tiramisu, and if you’re looking for a healthier treat, my high protein no bake biscoff cheesecake cups.

Ingredients to Make the Cookies and Cream Filling
- 6 whole Oreos, crushed but with chunks
- 12 inside centers of Oreos scraped out
- 1/2 cup unsalted butter
- 1 1/4 cup powdered/icing sugar
- 1 tsp clear vanilla extract (can use regular as well but the clear vanilla has more of a cookies and cream taste)
- 1 recipe of my homemade marshmallow fluff or 1 16 oz tub of store-bought
How To Make the Cake Filling:
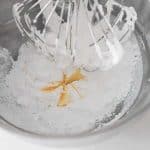
- In a large bowl, beat the softened butter until it’s creamy.
- Sift the powdered sugar and gradually add it along with the Oreo centers, vanilla extract, and a pinch of salt. Beat until everything is well combined and the filling is smooth.
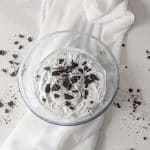
- Mix in the marshmallow fluff until the mixture is smooth and fluffy.
TIP: Coat your spatula with Crisco to easily get the marshmallow fluff into the mix - Gently fold in the crushed Oreo cookies. Be careful not to overmix, or you’ll lose that lovely crunch.
Storage: If you have any of the Oreo filling leftover, store it in an airtight container in the fridge for up to 3 days.
Some of my other popular fillings that go well with this cake are: Mascarpone Cream Filling Recipe. When adding this filling in chocolate cake, I like to add shaved chocolate curls or pearl crisps on top of the cream.
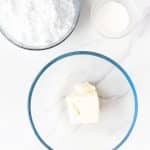
To Make the Buttercream Frosting you’ll Need:
- 1 cups unsalted butter, slightly cold
- 3 cups powdered sugar, measured and then sifted
- 2 tablespoons heavy whipping cream

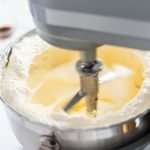
How to Make the Buttercream Frosting:
- Place the butter in the bowl of a stand mixer fitted with the paddle attachment and beat until smooth.
- Add half of the powdered sugar and a pinch of sea salt. Beat on low until the sugar is mostly incorporated.
- Add the remaining powdered sugar and continue beating on low until combined. Then, increase the speed to medium and beat for 3 minutes.
- Stop the mixer and scrape down the sides of the bowl.
- Add the vanilla extract, whipping cream, and food coloring (if using). Beat on low for an additional minute, then increase the speed to medium once the whipping cream is fully incorporated.
Now, Let’s Assemble the Cake!
- Stack and Fill: Place one cake layer on a serving plate or a cake board.
- I like to use a piping bag with about 1/4 inch snipped off to build a buttercream dam around the edge of my cake to keep the filling in, but this step is not absolutely necessary for this filling. It is more for cakes with liquid fillings that may seep out.
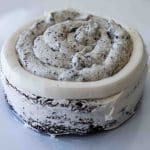
- Spread a generous amount of cookies & cream filling over the top. Place the second cake layer on top and repeat the process until all layers are complete.
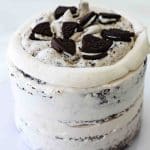
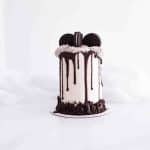
- Frost the Cake: Use the buttercream filling to frost the top and sides of the cake. I like to use an offset spatula and an icing scraper to do a crumb coat first and then put the cake in the fridge for 20-30 minutes. Once that layer is hard, add your final coat of icing using an offset spatula and an icing scraper to get a smooth finish. For an extra touch, you can add a chocolate drip to your cake and add Oreos on top.
Tips for the Best Cake
- Always use room temperature ingredients: Make sure your eggs and milk are at room temperature. It helps them mix more easily into the batter.
- Don’t Overmix: Mix just until the ingredients are combined to keep the cake light and fluffy.
- Use a kitchen scale to weigh the amount of batter you put in each cake pan for even layers.
- Make sure to cool the cake completely: Let the cake layers cool completely before frosting to avoid a melty mess. To have an even sturdier cake for decorating, freeze the cake layers overnight before stacking and filling.
- Keep cut cake fresh: Once you slice the cake, the exposed areas can dry out. To keep them fresh, wrap the exposed areas of the cake with a few slices of apple, cubes of sugar or a slice of fresh bread before placing in an airtight container or wrapping with plastic wrap.

Frequently Asked Questions
Absolutely! Feel free to get creative with your favorite fillings. So many different flavors go well with chocolate cake, I love my mascarpone filling with it too.
When it is completely frosted, the buttercream helps protect it so you can store it as is in the fridge. Once cut, store it in an airtight container in the fridge for up to 3-4 days. Bring to room temperature before serving for the best texture.
Tip to keep cut cake fresh: Once you slice the cake, the exposed areas can dry out. To keep them fresh, wrap the exposed areas of the cake with a few slices of apple, cubes of sugar or a slice of fresh bread before placing in an airtight container or wrapping with plastic wrap.
Yes, you can bake the cake layers ahead of time and freeze them. I wrap mine in a layer of plastic wrap then aluminum foil before freezing. Thaw partially in the fridge and assemble on the day you plan to serve it.
I’d love to hear how your baking turned out!
Leave a review and star rating to let me know what you think.
Don’t forget to tag me on Instagram so I can see and share your creations @thesprinkledcakery!
Easy Chocolate Cake with Cookies & Cream Filling
Ingredients
Chocolate Cake
- 2 cups sugar
- 2 cups all-purpose flour
- 3/4 cup cocoa powder
- 1 1/2 teaspoons baking powder
- 1 1/2 teaspoons baking soda
- 1 teaspoon salt
- 2 eggs
- 1 cup milk
- 1/2 cup vegetable oil
- 2 teaspoons vanilla extract
- 1 cup boiling water
- 1 teaspoon espresso powder optional ** NOTE: You can also use 1 cup of hot coffee in place of the boiling water and espresso powder or leave it out all together and just use boiling water. The coffee/espresso helps to bring out and enhance the chocolate flavor in the cake; you don’t taste the coffee.
Ingredients to Make the Cookies and Cream Filling
- 6 whole Oreos crushed but with chunks
- 12 inside centers of Oreos scraped out
- 1/2 cup unsalted butter
- 1 1/4 cup powdered/icing sugar
- 1 tsp clear vanilla extract can use regular as well but the clear vanilla has more of a cookies and cream taste
- 1 recipe of my homemade marshmallow fluff or 1 16 oz tub of store-bought
Frosting:
- 1 cups unsalted butter slightly cold
- 3 cups powdered sugar measured and then sifted
- 2 tablespoons heavy whipping cream
- 1 tsp clear vanilla extract can use regular as well but the clear vanilla has more of a cookies and cream taste and doesn't alter the color of the icing
- pinch salt
- dab violet food coloring helps cancel out the yellow tone of the butter. Start with a tiny dab on the end of a toothpick.
Instructions
Make the Cake Layers:
- Preheat and Prep: Preheat your oven to 350°F (175°C). Grease and flour four 6-inch round baking pans.

- Mix Dry Ingredients: In a large bowl, combine the sugar, flour, cocoa, baking powder, baking soda, and salt.2 cups sugar, 2 cups all-purpose flour, 3/4 cup cocoa powder, 1 1/2 teaspoons baking powder, 1 1/2 teaspoons baking soda, 1 teaspoon salt
- Add Wet Ingredients: Add the eggs, milk, oil, and vanilla. Beat on medium speed for about 2 minutes until smooth. The batter will be thin, but that’s what we want!2 eggs, 1 cup milk, 1/2 cup vegetable oil, 2 teaspoons vanilla extract
- Mix the Espresso Powder With the Boiling Water and Add to Cake: Mix the espresso powder into the boiling water and carefully add to the cake batter. The batter will be very thin at this point.1 teaspoon espresso powder, 1 cup boiling water
- Bake: Divide the batter evenly between the four prepared pans. TIP: I use a kitchen scale to ensure I put even amounts in each pan to get even cake layers. Bake for 30 to 35 minutes, or until a toothpick inserted into the center comes out clean.
- Cool: Allow the cakes to cool in the pans for about 20 minutes. Then, flip them upside down to release the cakes from the pans and transfer them to wire racks to cool completely.
Make the Cake Filling:
- In a large bowl, beat the softened butter until it’s creamy.1/2 cup unsalted butter
- Sift the powdered sugar and gradually add it along with the Oreo centers, vanilla extract, and a pinch of salt. Beat until everything is well combined and the filling is smooth. Mix in the marshmallow fluff until the mixture is smooth and fluffy.TIP: Coat your spatula with Crisco to easily get the marshmallow fluff into the mix12 inside centers of Oreos scraped out, 1 1/4 cup powdered/icing sugar, 1 tsp clear vanilla extract
- Gently fold in the crushed Oreo cookies. Be careful not to overmix, or you'll lose that lovely crunch.6 whole Oreos
Make the Frosting:
- Place the butter in the bowl of a stand mixer fitted with the paddle attachment and beat until smooth. Add half of the powdered sugar and a pinch of sea salt. Beat on low until the sugar is mostly incorporated.1 cups unsalted butter
- Add the remaining powdered sugar and continue beating on low until combined. Then, increase the speed to medium and beat for 3 minutes. Stop the mixer and scrape down the sides of the bowl, if needed.
- Add the vanilla extract, whipping cream, and food coloring (if using). Beat on low for an additional minute, then increase the speed to medium once the whipping cream is fully incorporated. The violet food coloring helps cancel out the yellow tone of the butter. A tiny dab is all you need. Start with a tiny dab on the end of a toothpick and mix. If you need more, do a small dab at a time. If you add too much, it will color the icing purple.2 tablespoons heavy whipping cream, 1 tsp clear vanilla extract, dab violet food coloring
Assemble the Cake:
- Stack and Fill: Place one cake layer on a serving plate or a cake board. I like to use a piping bag with about 1/4 inch snipped off to build a buttercream dam around the edge of my cake to keep the filling in, but this step is not absolutely necessary for this filling. It is more for cakes with liquid fillings that may seep out.
- Spread a generous amount of cookies & cream filling over the top. Place the second cake layer on top and repeat the process until all layers are complete.
- Frost the Cake: Use the buttercream filling to frost the top and sides of the cake. I like to use an offset spatula and an icing scraper to do a crumb coat first and then put the cake in the fridge for 20-30 minutes. Once that layer is hard, add your final coat of icing using an offset spatula and an icing scraper to get a smooth finish. For an extra touch, you can add a chocolate drip to your cake and add Oreos on top.
Notes
Baking the Cake Layers
- I used four 6-inch round pans, but you can also use two 8-inch pans.
- For best results, bring all ingredients to room temperature before starting. This helps create a smoother batter and a softer, more even crumb.
- Slightly soften your butter so it’s pliable but not melted—it should hold its shape when pressed.
- If your eggs are cold, let them sit in warm water for a few minutes to bring them to room temp quickly.
- To make assembling the cake easier, wrap and freeze the cake layers for a few hours to lock in moisture before assembling and make them easier to handle.
Making the Filling & Frosting
- Clear vanilla helps give that classic cookies-and-cream flavor and keeps the filling and frosting white.
- If your frosting feels too thick, add a splash of milk or cream until it reaches a smooth, spreadable consistency.
Assembling & Decorating
- Always make sure your cake layers are completely cool before frosting.
- To make decorating easier, chill or lightly freeze the cake before assembling.
- This cake keeps well at room temperature for about 1–2 days since the filling and frosting are butter-based. I recommend storing in the fridge. For best flavor and texture, let the cake come to room temperature before serving.
