Easy Tiramisu Without Eggs
If you’ve ever wanted to make tiramisu but felt put off by the raw eggs, this is your recipe. This easy no egg tiramisu is just as creamy and delicious with layers of espresso soaked ladyfingers and a rich mascarpone cream. And if you’re making it for Easter, I’ve included a fun Easter variation too!

*This page may contain referral links for products I use and love. As an Amazon Associate, The Sprinkled Cakery earns a small commission on these links at no cost to you. Read my full disclosure here.
This easy tiramisu with no eggs is creamy, rich, and full of classic coffee flavor. It’s made with simple ingredients and comes together without any fuss, making it perfect for when you want a homemade dessert that feels special but is still easy to make.
It also includes an Easter variation. And if you want more Easter recipes, check out my roundup of The Best Spring Dessert Recipes (From Healthy Treats to Easter Favorites) or 5 Easy Mini Egg Recipes next.
What Is Tiramisu?
Tiramisu (meaning “pick me up” in Italian) is a beloved Italian dessert featuring layers of coffee-soaked ladyfingers and creamy mascarpone filling. While traditional recipes use raw eggs, my version creates the same luxurious texture without them – perfect for those concerned about consuming raw eggs or pregnant women! I use my delicious Mascarpone Cream Recipe made with cream cheese and icing sugar for a sweet, tangy kick that’s irresistible.
Why This No-Egg Tiramisu Recipe Works
- No raw eggs means safer dessert everyone can enjoy
- Uses simple ingredients found in most grocery stores
- Perfect make-ahead dessert (actually tastes better the next day!)
- Festive Easter variation with mini eggs
- Only 30 minutes of hands-on time
- No complicated techniques required
Best Time to Enjoy Tiramisu
Tiramisu is a versatile dessert that can be enjoyed year-round, but it holds a special place during festive occasions and holidays. Its indulgent flavors make it a popular choice for special gatherings, celebrations, and romantic dinners. My family loves enjoying it at Easter with mini eggs on top to make it even more festive.

Why You Will Love this Recipe
This Tiramisu recipe is a game-changer for dessert lovers:
- No Raw Eggs: You don’t have to worry about using raw eggs in this recipe, making it safe and easy to prepare.
- Delicious Mascarpone Cream: My creamy filling uses a blend of mascarpone cheese, cream cheese, and powdered sugar for a sweet, tangy kick that’s irresistible.
- Easy and effortless: With straightforward steps and common ingredients, you can create a stunning Tiramisu without any hassle.
To Make this Easy Tiramisu without Eggs, You Will Need:

- Unsalted Butter: Adds richness and a smooth texture to the cream filling, enhancing the overall flavor.
- Cream Cheese: Provides a tangy flavor and creamy consistency to the filling, complementing the mascarpone cheese.
- Confectioners’ Sugar (Powdered Sugar): Sweetens and lightens the mascarpone cream filling, ensuring a smooth texture without grittiness.
- Vanilla Extract or Vanilla Bean Paste: Infuses a delightful vanilla flavor into the cream filling, adding depth to the dessert.
- Mascarpone Cheese: Essential for authentic Tiramisu, mascarpone cheese lends a creamy, velvety texture and rich flavor.
- Pinch of Salt: Balances the sweetness of the filling and enhances the overall flavor profile.
- Heavy Whipping Cream: Whipped to stiff peaks, the heavy cream adds volume and lightness to the mascarpone cream filling.
- Cold Espresso: Soaking the ladyfingers in cold espresso imparts a bold coffee flavor that is classic in Tiramisu.
- Espresso Powder: Intensifies the coffee flavor in the dessert, enhancing the overall taste experience.
- Coffee-Flavored Liqueur (Optional, like Baileys): Adds depth and complexity to the dessert with a subtle hint of coffee liqueur flavor.
- Ladyfingers: Absorb the espresso and liqueur, providing a soft, sponge-like texture that contrasts with the creamy filling.
- Cocoa Powder: Used for dusting the top of the Tiramisu, adding a finishing touch and hint of chocolate flavor.
- Optional Chocolate Shavings: I like to add Premium Belgian Chocolate Shavings on top of mine for a rich, chocolatey taste.
- Mini Eggs: At Easter, top with chocolate Mini Eggs for a festive touch!
To Make this Easy Tiramisu, You Will Need the Following Materials and Equipment:
- Mixing Bowls: Use medium to large-sized mixing bowls for preparing the cream filling and assembling the Tiramisu layers. These are my favorite ones.
- Electric Mixer (Hand Mixer or Stand Mixer): This will be used to whip the heavy cream and mix the cream cheese and mascarpone filling. I love my Kitchenaid stand mixer.
- Sifter or Sieve: Needed to sift the powdered sugar for a smooth texture in the cream filling.This set is great because it has the larger one for your icing sugar and the smaller one for dusting your cocoa.
- Measuring Cups and Spoons: Essential for accurately measuring ingredients like butter, sugar, vanilla extract, and espresso.
- Spatula or Mixing Spoon: Use for folding in the mascarpone cheese into the cream filling and for assembling the Tiramisu.
- Shallow Bowl: For dipping the ladyfingers into the espresso mixture.
- Rectangular Baking Dish or Serving Dish: Choose a dish that’s suitable for layering the Tiramisu. An 8×8 or 9×9 works best. I used a 8×8 glass dish with lid, perfect for storing in the fridge.
- Coffee Maker or Espresso Machine: To brew the espresso needed for soaking the ladyfingers. Or you can purchase the espresso already made.
- Knife or Offset Spatula: Use for spreading the cream filling and creating even layers in the Tiramisu.
- Cocoa Powder Sifter or Fine Mesh Sieve: For dusting cocoa powder over the top of the assembled Tiramisu.
How to Assemble the Easy Tiramisu Without Eggs:


Prepare the Coffee Mixture
- Combine cold espresso, coffee liqueur, and espresso powder
- Set aside to cool completely
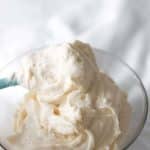
Make the Mascarpone Filling
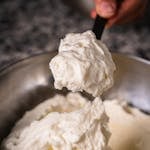
- Beat heavy cream until stiff peaks form (about 4 minutes)
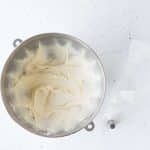
- In separate bowl, cream together butter and cream cheese
- Add powdered sugar gradually until light and fluffy
- Fold in mascarpone gently
- Finally, fold in whipped cream
Assembly
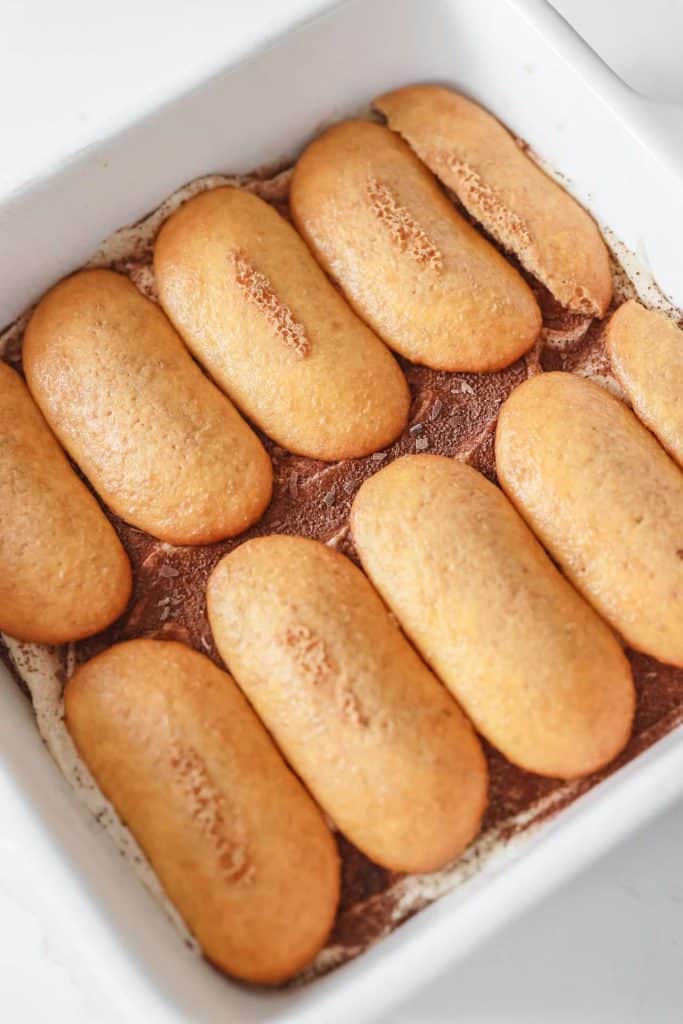
- Quick-dip each ladyfinger in coffee mixture (1-2 seconds)
- Layer in 8×8 or 9×9 dish
- Spread half the mascarpone mixture
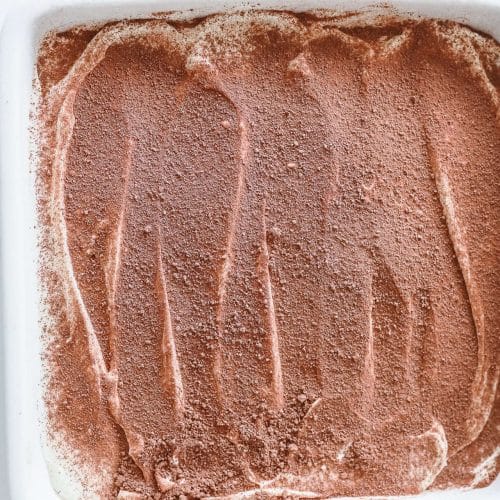
- Repeat layers
- Dust with cocoa powder
- Chill and set 6-8 hours or overnight in the fridge
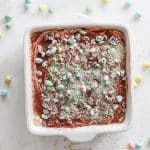
Easter Version
- Top with chocolate mini eggs
- Add chocolate shavings
- Chill 6-8 hours or overnight
More No-Bake Recipes I Think You’ll Love:
- Authentic Cannoli Filling Recipe with Chocolate Chips and Pistachios
- Healthy No-Bake Samoa Cookies (Vegan, Gluten-Free, Refined Sugar-Free)
- Cinnamon Rice Cake Protein Bars (with Dates & Maple Cream Cheese Frosting)
Tips to make the best Tiramisu:
- Ladyfingers: These are dry Italian sponge cookies that add texture to Tiramisu. Look for Savoiardi biscuits in the cookie aisle of your grocery store. To make this gluten free, the Schar brand sells gluten free ladyfingers available at most local grocery stores. Or, if you’re feeling really adventurous, you can make your own using this recipe from Pies and Tacos.
- Where to Buy Ladyfingers: You can find ladyfingers at your local grocery store or order them online from Amazon.
Frequently Asked Questions:
Tiramisu can be made 1-2 days in advance and stored in the refrigerator. I find that it actually tastes better when prepared the night before. It can also be frozen for up to 3 months but keep in mind that the texture of the filling may change slightly.
No, you can absolutely make Tiramisu without alcohol. The liqueur adds additional flavor but Tiramisu is still delicious without it.
No. I like the extra depth of coffee flavor it adds, but it is not needed. You can also substitute regular coffee for espresso if a lighter coffee taste is desired.
Yes, you can substitute mascarpone with additional cream cheese, ricotta cheese, or even cottage cheese but the taste will differ.
Pro Tips for Success
- Don’t oversoak the ladyfingers – quick dip only!
- Use room temperature mascarpone and cream cheese
- Let chill at least 6 hours, preferably overnight
- For Easter, add mini eggs just before serving to maintain their crunch
Storage Instructions
- Refrigerator: Keeps for up to 4 days
- Freezer: Can be frozen for up to 3 months (without mini egg topping)
Variations & Substitutions
- Make it alcohol-free: Skip the coffee liqueur
- Gluten-free option: Use Schar gluten-free ladyfingers
- Holiday versions:
- Easter: Top with mini eggs and pastel sprinkles
- Christmas: Use crushed candy canes
- Valentine’s: Add chocolate-covered strawberries
Easy Tiramisu Without Eggs
Ingredients
- 1 cup 227g unsalted butter, softened at room temperature
- 1 brick 250g full-fat cream cheese, softened at room temperature
- 2 cups 230g confectioners’ sugar (powdered sugar)
- 2 tsp 4g vanilla extract or vanilla bean paste
- 1 cup/8oz 226g mascarpone cheese, room temperature
- Pinch of salt
- 2 cups heavy whipping cream
- 1 cup cold espresso
- 1 tsp espresso powder optional
- 2 tablespoons coffee-flavored liqueur optional, I used Baileys
- 1 400 g package Ladyfingers or 2 smaller packages if using the giant ones like I did. For the giant ones 17 total will be needed. If using regular sized ones, it will be more.
- Cocoa powder & chocolate shavings for dusting the top
- Mini Eggs for top if making for Easter
Instructions
- Prepare the Coffee Mixture: Combine cold espresso, coffee liqueur, and espresso powder. Set aside.1 cup cold espresso, 2 tablespoons coffee-flavored liqueur, 1 tsp espresso powder

- Make the Mascarpone Filling: Beat heavy cream until stiff peaks form (about 4 minutes).
- In separate bowl, cream together butter and cream cheese. Add powdered sugar gradually until light and fluffy, vanilla and salt if using unsalted butter.1 cup 227g unsalted butter, softened at room temperature, 1 brick
- Fold in mascarpone gently, then fold in whipped cream.1 cup/8oz
- Assembly: Quick-dip each ladyfinger in coffee mixture (1-2 seconds) then add to 9×13 dish.
- Spread half the mascarpone mixture and repeat the layers.
- Dust with cocoa powder. Chill 6-8 hours or overnightCocoa powder & chocolate shavings for dusting the top
- Easter Version: Top with chocolate mini eggs and optional chocolate shavings just before serving so that the dye on the eggs doesn't run into the frosting.


Notes
Pro Tips for Success
- Don’t oversoak the ladyfingers – quick dip only!
- Use room temperature mascarpone and cream cheese
- Let chill at least 6 hours, preferably overnight
- Tiramisu can be made 1-2 days in advance and stored in the refrigerator. I find that it actually tastes better when prepared the night before.
- For Easter, add mini eggs just before serving to maintain their crunch
Storage Instructions
- Refrigerator: Keeps for up to 4 days
- Freezer: Can be frozen for up to 3 months (without mini egg topping)