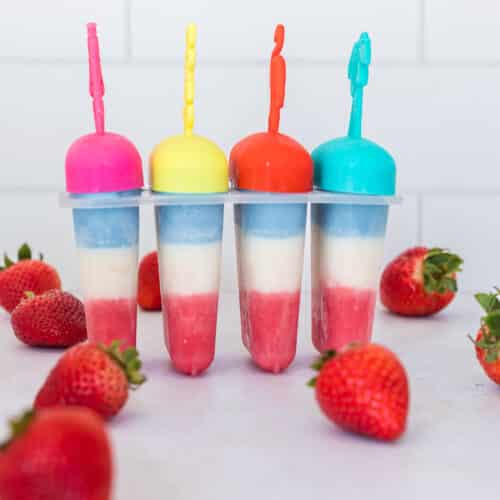
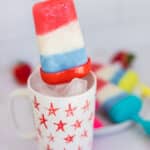
Healthy Red White and Blue Popsicles
These Healthy Red White and Blue Popsicles are naturally sweetened with fruit, yogurt, coconut cream, and maple syrup for a refreshing frozen dessert everyone will love.
Perfect for Canada Day, the Fourth of July, Memorial Day, backyard BBQs, and pool parties, these homemade patriotic popsicles get their vibrant colors from strawberries and blue spirulina instead of artificial food dyes.

QUICK LOOK: HEALTHY RED WHITE AND BLUE POPSICLES
⏱️ Prep Time: 15 minutes
❄️ Freeze Time: 4–5 hours
⏳ Total Time: About 5 hours
🍽️ Servings: 4 popsicles
🔢 Calories: ~125 per popsicle
💡 Difficulty: Easy
🥣 Key Ingredients: Strawberries, pink lemonade, yogurt, coconut cream, maple syrup, blue spirulina
🌿 Dietary Info: Naturally sweetened, gluten-free, dairy-free option
✨ What Makes These Popsicles Special: These homemade red white and blue popsicles get their vibrant colors from real ingredients instead of artificial dyes, creating a healthier patriotic treat that’s perfect for summer celebrations.
There’s just something so fun about red, white, and blue treats in the summer. Whether you’re celebrating Canada Day, the Fourth of July, or simply looking for a refreshing snack on a hot afternoon, these Healthy Red White and Blue Popsicles are an easy homemade treat everyone will love.
They’re made with simple ingredients like strawberries, yogurt, coconut cream, maple syrup, and blue spirulina for their bright, festive colors. The strawberry layer is sweet and fruity, the middle layer is creamy and smooth, and the blue layer adds a fun pop of color without any artificial food dyes.
What I love most about these homemade red white and blue popsicles is that they’re easy to customize and made with ingredients you can feel good about serving. They’re a fun project to make with kids, perfect for summer parties and backyard barbecues, and so much more refreshing than many store-bought popsicles.
If you’re putting together a summer menu, serve them alongside my Watermelon Mint Mojito Mocktail, Mango Passionfruit Mocktail, or Blackberry Coffee Cake for a colorful spread that’s guaranteed to disappear fast.
And if you’re looking for more red, white and blue recipes, try my Strawberry Blueberry Coconut Water Mocktail next.
Why You’ll Love These Dye-Free Red, White & Blue Popsicles
Key Ingredients Notes & Substitutions
Here’s a look at the main ingredients and easy substitutions. * For exact measurements and instructions, scroll down to the recipe card.

This page may contain referral links for products I use and love. As an Amazon Associate, The Sprinkled Cakery earns a small commission on these links at no cost to you. Read my full disclosure here.
Recommended Supplies/Tools
- Popsicle mold
- Popsicle sticks
- High-speed blender – a mini blender works best for this small batch recipe
- Measuring cups and spoons
- Small kitchen knife
How to Make Healthy Red White and Blue Popsicles
Time needed: 5 hours and 15 minutes
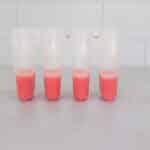
- Make the Red Layer
Add the strawberries and pink lemonade to a blender. Blend until completely smooth. Pour the mixture evenly into the popsicle molds, filling each mold about one-third full. Freeze for 1 hour or until mostly set.

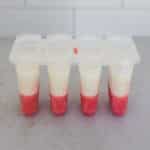
- Make the White Layer
Add the coconut cream, yogurt, and maple syrup to the blender. Blend until smooth and creamy. Pour the mixture over the frozen red layer until the molds are about two-thirds full. Return to the freezer for another hour.
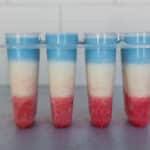
- Make the Blue Layer
Add the remaining coconut cream, yogurt, maple syrup, and blue spirulina to the blender. Blend until smooth. You could also blend the spirulina with coconut water or a clear fruit juice like white grape or apple for less creamy layer. For extra fruit flavor, add 1/4 cup frozen blueberries and blend again. Place the mixture in the refrigerator while the white layer freezes. Once ready, remove the molds from the freezer and use a small knife to carefully create a slit in the center of each popsicle so the sticks can slide all the way in. Pour the blue mixture over the white layer until the molds are full then insert the popsicle sticks. Freeze for 2 to 3 more hours, or until completely firm.
- Serve
Run the outside of the popsicle mold under warm (not hot) water for 10 to 20 seconds.
Gently pull the popsicles out and enjoy.


Macros (Per homemade popsicle)
- Calories: 125
- Protein: 4g
- Carbohydrates: 11g
- Fat: 8g
- Fiber: 1g
- Sugar: 9g
NOTE: Nutrition information is an estimate based on the ingredients used and may vary depending on brands and substitutions.
Trish’s Tips to Make Layered Popsicles Easy
- Freeze each layer completely before adding the next for clean, defined stripes.
- Use full-fat coconut cream for the creamiest texture.
- Greek yogurt or skyr creates a thicker, creamier popsicle with more protein.
- If your blender struggles with small amounts, double the recipe and make extra popsicles.
- Blending blueberries into the blue layer, can make the popiscles turn a deeper purplish-blue. For the brightest blue color, skip the blueberries.

Frequently Asked Questions
Absolutely. You can use butterfly pea powder, or blueberries instead, but the blue layer will turn more purple than blue if using blueberries.
Freezing each layer helps create clean stripes and prevents the colors from blending together.
Patriotic popsicles are frozen treats made with red, white, and blue layers to celebrate holidays like Canada Day, Memorial Day, and the Fourth of July. These healthy patriotic popsicles use real ingredients instead of artificial dyes.
Yes. These homemade red white and blue popsicles can be made several days or weeks ahead and stored in the freezer until needed.
More Recipes I Think You’ll Love:
I’d love to hear how your baking turned out!
Leave a review and star rating to let me know what you think.
follow along
Healthy Red White and Blue Popsicles
Equipment
- Popsicle Mold
- Popsicle sticks
- High-speed blender personal size works best for this small batch recipe
- Measuring cups and spoons
- Small kitchen knife
Ingredients
Red Layer
- ½ cup frozen strawberries or fresh strawberries or your fav red fruit
- ¼ cup pink lemonade
White Layer
- ¼ cup coconut cream
- ¼ cup vanilla or plain Greek yogurt skyr, or yogurt of choice
- 1 tablespoon maple syrup
Blue Layer
- ¼ cup coconut cream
- ¼ cup vanilla or plain Greek yogurt skyr, or yogurt of choice
- 1 tablespoon maple syrup
- 1 teaspoon blue spirulina
- ¼ cup frozen blueberries for extra fruit flavor optional
Instructions
Make the Red Layer
- Add the strawberries and pink lemonade to a blender. Blend until completely smooth. Pour the mixture evenly into the popsicle molds, filling each mold about one-third full. Freeze for 1 hour or until mostly set.½ cup frozen strawberries, ¼ cup pink lemonade

Make the White Layer
- Add the coconut cream, yogurt, and maple syrup to the blender. Blend until smooth and creamy. Pour the mixture over the frozen red layer until the molds are about two-thirds full. Return to the freezer for another hour.¼ cup coconut cream, ¼ cup vanilla or plain Greek yogurt, 1 tablespoon maple syrup
Make the Blue Layer
- Add the remaining coconut cream, yogurt, maple syrup, and blue spirulina to the blender. Blend until smooth. For extra fruit flavor, add 1/4 cup frozen blueberries and blend again. You could also blend the spirulina with coconut water or a clear fruit juice like white grape or apple for less creamy layer. Place the mixture in the refrigerator while the white layer freezes. Once ready, remove the molds from the freezer and use a small knife to carefully create a slit in the center of each popsicle so the sticks can slide all the way in. Pour the blue mixture over the white layer until the molds are full then insert the popsicle sticks. Freeze for 2 to 3 more hours, or until completely firm.¼ cup coconut cream, ¼ cup vanilla or plain Greek yogurt, 1 tablespoon maple syrup, 1 teaspoon blue spirulina, ¼ cup frozen blueberries for extra fruit flavor
Serve
- Run the outside of the popsicle mold under warm water for 10 to 20 seconds. Gently pull the popsicles out and enjoy.
Notes
- Freeze each layer completely before adding the next for clean, defined stripes.
- Use full-fat coconut cream for the creamiest texture.
- Greek yogurt or skyr creates a thicker, creamier popsicle with more protein.
- If your blender struggles with small amounts, double the recipe and make extra popsicles.
- Adding blueberries may turn the blue more of a darker purplish-blue.
